Initial Planning
Choice of Instrument

It makes sense to have a specific instrument in mind when planning a observatory building. With this in mind, I started investigating possible telescopes in early 2007. My informal schedule for building the observatory was a couple of years out at that time. As it happened, I found a really attractive price on a 16-inch RCX400 that had been used as a display model. After a weekend trip to the store to look over the scope in person, I decided this was the one. Within two weeks a 500-pound pallet was gently landed on my driveway.
This telescope was much too big to haul out to the existing observing pad, and needed a permanent setup. It was time to build the observatory.
The packaging of the telescope, on a wooden palette and secured by plastic wrap, is worth noting. I have seen postings in some forums reporting RCX400 problems -- even for telescopes shipped directly from Meade -- apparently due to the scope's poor tolerance for being shipped. After fairly extensive usage, my telescope has shown no such problems. The solid packaging may be at least partly responsible for the trouble-free performance of the telescope.
Type of Building
After the telescope, the major design choice to be made was roll-off roof vs. dome observatory. I have always admired roll-off roof designs, primarily because of the all-sky view and the feeling of open space. For the new observatory I somewhat reluctantly chose a dome design. The choice was driven by the site. Wind is always an issue at my location, and for much of the year it brings a biting chill. I don't think a roll-off roof would provide enough shelter, unless the walls were so high that they would cut off some of the view to the horizon.
A second consideration was light pollution, from three sources: fast-growing Idaho Falls to the northeast, neighbors' porch lights, and headlights of passing cars. The dome minimizes distractions from all of these. I especially enjoy the quiet, peaceful environment inside the dome when observing. It allows me to focus on what I am doing.
After review of the offerings for prefabricated observatories, including visits to existing installations, I chose the Technical Innovations 10-foot ProDome with four-foot side walls. The 10-foot size provides enough space for me, my equipment, and a couple of guests.
There was, and still is, a case to be made for installing the dome on conventionally built frame walls. However, at the time I thought that putting up the entire structure from pre-fabricated parts would be the simplest and fastest approach.
Site Selection

With a lot size of over two acres, I had some flexibility in the choice of the observatory location. I ruled out the location of the existing observing pad, because a neighbor was planning to build a large structure just east of it. The following criteria seemed important:
- Far enough from from the property line to satisfy local covenants
- Far enough from the residence to minimize the amount of sky it blocks
- Does not block the view to the North or West for any existing or prospective neighbors. The view, of five mountain ranges up to 80 miles away, is a major reason why many of us live in this neighborhood.
- Minimizes blockage of the sky by any existing or prospective neighbors, especially to the South and East
- Outside the range of the existing sprinkler system. The major watering of the lawn takes place at night, during prime observing time.
I chose a spot about 125 feet southwest of the residence, with a clear line of sight to the horizon from Southeast through West to North. A few rooflines extend above the horizon, but not more than two degrees.
Approvals

I live in a neighborhood controlled by covenants, and any new outbuilding such as the observatory has to comply with those covenants. The only significant restriction is that the building must be at least 20 feet from the side property line and 50 feet from the rear property line. That's fine with me; I prefer to keep my distance from other houses. Obtaining approval from the Architectural Control Board was straightforward.
I also took it upon myself to minimize the effect of the observatory on any of my neighbor's views, and to make a courtesy call on each of my neighbors to inform them of my plans. Idaho is a great place to live -- I have fine neighbors, and no one raised an objection.
As a final courtesy, I chose a color for the observatory that coordinates with our own house and the general trends in the neighborhood. A white or silver dome might look very astronomical, but it would stand out like a sore thumb in a cluster of earth-toned residences!
The most important approval is, of course, by my remarkable wife Laura. She has been consistently supportive of my astronomy activities, which consume my time and our resources. I consider myself fortunate to have such a continuing source of support.
Telescope Pier
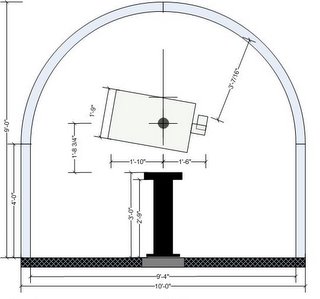
The choice of telescope pier was easy, since I have been delighted with the LeSueur Manufacturing Astro Pier installed at the observing pad. With the telescope already available, it was easy to get the needed measurements and calculate the appropriate pier height. The ideal height places the bottom of the telescope aperture at the height of the dome wall (bottom of the shutter opening) when the telescope is pointed at the horizon.
The crucial choice was altazimuth vs. equatorial mounting. I chose altazimuth for the initial installation, based on these criteria:
- The 16-inch RCX400 has a different base, with a larger bolt circle, than the 14-inch and smaller telescopes. It's also quite heavy; the optical tube assembly alone weighs about 135 pounds. As a result, I could find no commercially available wedges for the telescope.
- A custom-built wedge of appropriate quality was likely to cost over $1000.
- The principal advantage of an equatorial mount is for long exposure astrophotography. I did not foresee getting into that activity for quite a while.
- Altazimuth mounting of a fork-mounted telescope is much better for visual observation, especially at high declinations.
Some amateur astronomers would consider it heresy to place a telescope with so many features supporting astrophotography on an altazimuth mount. I respectfully disagree. The RCX400 is a superb visual telescope, and visual observing is an honorable and very enjoyable pursuit. I understand the attraction of spending the time and labor to produce beautiful images of astronomical objects. It's just not how I choose to spend my limited observing hours for now.
Services


Based on my experience with the observing pier, and visits to other observatories, it is a lot easier to install the right utilities at the outset than to add them later. For this reason, I planned on ample electrical and information services with provision for expansion. The major elements are
- At least two independent electrical circuits - one for noisy equipment such as motors, and one for electronics
- Switched electrical outlets on each circuit, to allow lighting to be controlled from a switch panel near the door
- Ethernet service capable of being linked to the household network, and thence to the Internet
- Video cabling, to support video cameras, and even broadband cable service
- Telephone service
- Household intercom service
- Provision for security sensors and panels
- Spare conduits to support future expansion
- Multiple information service ports in the observatory, including at the walls and pier. Conduits to the ports run under the observatory slab, to eliminate trip hazards.
I planned for major workstations along the east and west walls. The observatory door had to be oriented to the northeast. This orientation keeps the door, and the home position of the shutter, opposite the prevailing wind and also on a direct line to the residence.
The dome rotation controls, motor and power supply are normally placed just counter-clockwise from the door. It is prudent to place the workstations somewhat apart from them; hence the choice of east and west workstations. I am primarily using the west workstation, with the computer monitor and keyboard to the northwest. My primary observing is to the east and south, to take advantage of the darkest sky and least accessible objects. This positioning has worked out quite well in practice.
The installation of the conduits and wiring services were a significant effort and expense. Based on the convenience it has brought to the use of the observatory, and the flexibility for the future, I don't regret any part of the services installation.