Specifications


| Foundation | |
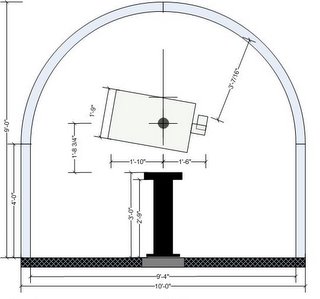
| Size | 12x12 feet |
| Material | 6000 lb. unreinforced concrete |
| Thickness | 6+ inches |
| Telescope Pier Foundation | |
| Size | 18 inches diameter, 54 inches deep, 6 inches above ground level |
| Material | 3000 lb. unreinforced concrete |
| Isolation from main foundation | Sonotube left in place
Note that the 18-inch Sonotube was only used as a form for the above-ground portion of the pier foundation. The below-ground foundation was poured into undisturbed earth. There is no rock at our location down to the depth of the pier foundation. The soil used as the form for the pier foundation has been compacted by centuries of precipitation and is a solid underlayment for both foundations. |
| Structure | |
| Building Type | Technical Innovations Prodome Model PD-10 |
| Material | 0.125-inch fiberglass |
| Diameter | 10 feet |
| Wall height | 4 feet (four rings) |
| Maximum height | 9 feet |
| Color | Outer: Tan, in gel-coat Inner: Midnight Blue |
| Shutter | |
| Width | 36 inches |
| Height | Clear aperture from top of wall to beyond zenith |
| Additional options | |
| Dome rotation motors | |
| Electric shutter operation | |
| Technical Innovations Digital Dome Works Controller | |
| Telescope Pier | |
| Make/Model | LeSueur Manufacturing Astro Pier, Black Aurora |
| Material | Steel |
| Height | 21 inches |
| Diameter | 8.25 inches |
| Color | Black |
| Attachment to Foundation | 3 J-bolts embedded in foundation |
| Telescope Adapter | Altazimuth mounting plate |
Planning and Construction
I had given thought to a personal observatory even before my retirement in 2005. When we made plans for our retirement home, one of the criteria was that the lot include a suitable site for an observatory.
Detailed planning began in March 2007 with the selection and purchase of the telescope. Within a month we had selected the site and placed the order for the PD-10.
Work began on the foundations in mid June, and assembly of the building began in late June. The assembly of the dome, while straightforward in principle, took much longer than expected. There are scores of holes to drill and bolts to install. The biggest difficulty was installing the wall rings on the foundation pad, such that the top of the wall, which serves as the dome rotation track, was circular and level. The story of the assembly will be of interest to anyone contemplating building this type of observatory.
Assembly of the building was completed in September 2007. Most of the remaining fitout was completed in about six weeks, and first light was celebrated in late October. Installation of some interior fittings and some minor observatory features was delayed until 2008 by a harsh winter that froze out almost all activity at the observatory.
Weatherproofing

The PD-10 when initially assembled is not weatherproof. Each of the gaps between the fiberglass components had to be sealed with clear caulking compound (provided with the observatory kit).
A soffit piece, also provided with the observatory kit, was installed to mostly close the gap between the bottom of the rear shutter and the dome support ring. The edges of the soffit were also caulked.
The gap between the wall rings and the concrete pad was filled with low-expansion foam, and then sealed with heavy-duty caulking compound on both the inside and the outside.
A rubber door sweep was installed on the bottom of the door to close that gap.
The most difficult and expensive step was the installation of brush weatherstripping around the circumference of the dome. The gap between the dome and the wall varies between one and two inches. The gap provides a tortuous path for entry of dust and moisture, and the observatory kit makes no provision for further sealing it. This is probably fine for relatively sheltered locations. But frequent high winds at my location blew a lot of dust and precipitation through the gap, and made the observatory unusable until the mess was cleaned up. The weatherstripping largely eliminated the problem and also made insect entry much more difficult.

In November 2021, I found that the brush weatherstripping had deteriorated due to exposure and the brushes were creating too much drag on the dome rotation. Also, dust and moisture were still entering under the dome support ring, and insect nests were occasionalIy found under the brushes. I replaced the weatherstripping with an eight-inch wide vinyl skirt that eliminated dust and moisture entry and had no effect on dome rotation. A drawstring around the bottom of the skirt can tighten the seal to inhibit insect entry when the observatory is not in use.
Operation
I can usually start up the observatory from fully secured to observing within five minutes, and fully secure it in about the same amount of time. A more detailed description of the operation is provided in the link below.
Maintenance

I'm still learning about observatory maintenance. A few standard tasks such as lubrication and inspection are called out in the operation manuals; others are learned by experience.
The most frequent task is cleaning. The second most frequent is adjustment and retightening of various items. These are frequent enough that I just keep a toolbox, parts bin, and cleaning supplies ready to use in the observatory.
I've concluded that an observatory does not reduce the overall time and effort required to carry out an observing program; in fact it probably increases it. But it does allow most of the effort to be rescheduled to non-observing time.
hits from
visitors
This page last revised on 12/22/2021